Monday, 10 September 2018

Creative Team Bunch of Flowers Art Journal Page

Creative Team Bunch of Flowers Art Journal Page

by Dani Choate


Simply stunning, Dani has created these free form flowers using the lovely Cadence Shabby Chic Texture Pastes. With a matt finish the texture paste gives her work a 3D quality.

Supplies:


Tim Holtz small talk stickers

Dylusions journal insert sheets

Brush


Wednesday, 5 September 2018

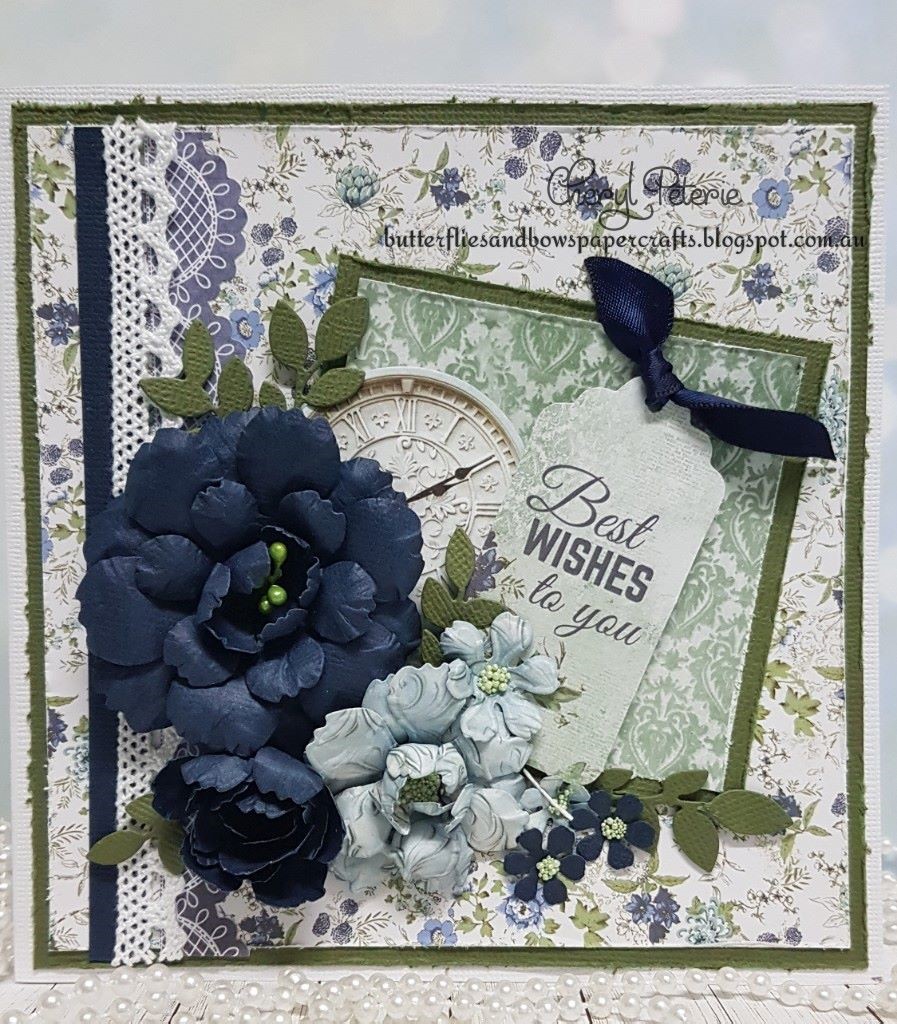
Creative Team Lacy Floral Blooms Card

Creative Team Lacy Floral Blooms Card

by Cheryl Peterie


Supplies:

Kaisercraft Paper Pad 6½"  - Wandering Ivy
Kaisercraft Collectables Pack - Wandering Ivy
Kaisercraft Sticker Sheet - Wondering Ivy
Kaisercraft Cardstock - Forest & Navy
Stamens - Green
Satin Ribbon - Navy
Lace - White
Basic tool kit (Crafts4U trimmer, scissors, Crafts4U double sided Tape, Crafts4U Foam Tape, pencil, tweezers etc), Glue, Washi Tape (for holding dies in place), Die Cutting Machine.


Instructions:

 
Cut the following pieces
White Cardstock (card base) - cut a 6" x 12" card base fold in half & score to form a 6" x 6" square.
Forest Cardstock (background mat) - cut a 5¾" x 5¾" & a 3¼" x 3¼" distress the edges of both mats.
Navy Cardstock - ½" x 5½" strip.
Lace - 5½"
Pattern Paper (background) - 5½" x 5½" & a 3" x 3" distress the edges of both backgrounds.
Attach the pattern pieces to the background mats leaving an even border, next attach the large background to the front of the card, then the small mat to the card front, add the navy strip, the scallop lace sticker (from sticker sheet) & the white lace to the left side of the card front.


To make the flowers

(NB; with nesting dies No.1 being the smallest) 

Die-cut the following pieces for all flowers (pattern & navy), individual pictures show what petals are needed for each flower.

Navy cardstock

·         Two - No.6 petals

·         Three - No.4 petals

·         Two - No.3 petals

·         Two - No.1 petals

Pattern Paper (not pictured with dies) lightly blend the entire petal with Distress Ink - Stormy Sky

·         Two - No.4 petals 

·         One - No.3 petal 

·         One - No.2 petal

·         One - No.1 petal

Forest Cardstock - one Leafy Branch & cut in to four pieces.

Shape all the petals using the Heartfelt Creations Deluxe Flower Shaping Kit 


Two No.4 & One No.3 Petals to make the medium navy flower


Large Navy Flower: Offset & adhere the two No.6, No.4 & No.3 petals together, pierce a hole through the centre & add the stamens, apply dries clear glue to both sides of the hole to secure the stamens when dry cut off the stems at the back of the flower.

Medium Navy Flower: Adhere the two No.4 & No.3 petals together & shape into a bud.

Medium Pattern Flower: Offset & adhere the two No.4 petals & the No.3 petal, adding prills to the centre

Single Flowers: Shape & add prills to the centres.

 
I have used the "Best Wishes" tag from the paper pad & the clock from the collectables pack, tie a piece of satin ribbon through the top of the tag using foam tape mount to the card front, next attach the clock then to finish adhere the leaves & flowers.
 
 
Created by Cheryl Peterie


Monday, 3 September 2018

Creative Team Sunshine Fairy Easel Card

Creative Team Sunshine Easel Fairy Card

by Cheryl Peterie


Supplies:

Kaisercraft Fairy Garden Collectables pack
Kaisercraft 12x12 Paper - Chartreuse
G.C.D Studios 12x12 Paper - Abbies Sunshine
Sticky Pearl Strips
Satin Ribbon 1/4"
 
 
Basic tool kit (Crafts4U trimmer, scissors, Crafts4U double sided Tape, pencil, tweezers etc), Die Cutting/Embossing Machine, Washi Tape (for holding dies in place).


Instructions:

 
Start with a base of White cardstock measuring 10cm x 30.5cm, fold in half & score then fold the left edge to the centre line & score, next cut a 10cm x 15.3cm background mat.
 
 
Place some double sided tape on the front panel as shown & attach the background mat to the base card.


Die cut the Crafts4U Die Layered Frame 1 from the Abbies Sunshine- pattern paper (yellow daisy side) & adhere to the card front leaving an even border top & bottom, next using the Crafts4U 12mm x 4m Foam Tape mount the cut-out back in place to the card front.


(NB; with nesting dies No.1 being the smallest)


  1. Attach the dots embossed frame to the centre of the card front over the mounted daisy label leaving an even border.
  2. Adhere the embellishments from the Fairy Garden Collectables pack (ie: leaves, banner, butterfly) one large flower from the Little Birdie Bernadette Lemon 6pk, & two small flowers from the Little Birdie Curly Rose Yellow 12pk to the card front.
  3. Place the mounted glitter fairy to the card front.
  4. Tie a small bow & adhere to the bottom under the large flower.
  5. Add a strip of sticky pearls along the top & bottom of the background frame

Base Stopper
Cut a 5.5cm x 10cm piece from the Chartreuse - (yellow pattern paper) & attach to the bottom inside of the card base, attach the No.1 yellow sentiment label to the No.2 embossed dots white label & mount to the centre of the base stopper next add a small butterfly from the Fairy Garden Collectables pack to the bottom right corner.


Monday, 27 August 2018

Creative Team Framed Memories Card

Creative Team Framed Memories Card

By Cheryl Peterie


Supplies:


Kaisercraft 12x12 Paper - Chartreuse
Kaisercraft Collectables Pack - Heirloom
Satin Ribbon 1/4"
 

Tools:

Basic tool kit (Crafts4U trimmer, scissors, Crafts4U double sided Tape, pencil, tweezers etc),Die Cutting/Embossing Machine, Washi Tape (for holding dies in place), Paper Distresser.


Instructions:

 
Fold & score a piece of A5 White card in half, Die cut the  Crafts4U Die Lacey Border 3 10161 along the right side of the card


Cut a background panel from the pattern paper(yellow side) to measure 8cm x 14.5cm, distress the edges, attach a piece of satin ribbon to the right side & attach to the card front.


(NB; with nesting dies No.1 being the smallest)

·         Nest & die cut the No.2 & No. 3 labels from the Layered Frame set (floral side of the above pattern paper)

·         Die cut the No.1 label (yellow side of pattern paper) Stamp your desired sentiment.

 
Mount the frame using Crafts4U 3mm x 4m Foam Tape 2mm Thick 30013 & attach to the card front.


From the Heirloom Collectables pack attach the stop watch inside the bottom left corner of the frame, the "Our Memories Will Last Forever" sentiment to the right side of the frame & the Remember banner to the top left corner of the card.

 
Attach the No.1 yellow label to the No.2 floral label & attach to the inside centre of the card.


Adhere a mix of small flowers & two leaves from the Little Birdie Curly Rose Yellow 12pk CR62800, Little Birdie Renae Blush 27pk CR63041, Little Birdie Renae Celeste 27pk CR63038 flower packs to the card front, then tie a small bow from the satin ribbon & adhere under the flowers to the bottom of the frame.


Wednesday, 22 August 2018

Creative Team Mixed Media Cards

Creative Team Mixed Media Cards

by Dani Choate


Supplies:

Cocoa Vanilla wood veneer lettering
3 different butterfly dies
Rectangular die
Decorative round die - 70032