Showing posts with label die cutting. Show all posts

Monday, 17 September 2018

Creative Team Precious Petals

Creative Team Precious Petals

by Cheryl Peterie


Supplies:


Kaisercraft - Wondering Ivy 6½" Paper Pad
Kaisercraft Card Stock - Forest
Kaisercraft Cardstock - Navy
Navy Satin Ribbon
Sticky Pearl strip
Twine - Navy

Tools

Basic tool kit (Crafts4U trimmer, scissors, Crafts4U double sided Tape, Crafts4U Foam Tape, pencil, tweezers etc), Glue, Washi Tape (for holding dies in place), Die Cutting Machine, Flower Shaping Kit.


Instructions:

(NB; with nesting dies No.1 being the smallest)

Die-cut the following pieces


·         One diamond frame & the two stems together from a piece of A5 white card.

·         One lacy border from a piece of pattern paper.

·         One set of leaves from the forest cardstock (cut into three pieces).

·         One No.4 Tag from a piece of pattern paper.

·         flowers from navy cardstock (one No.2, one No.4 & two No.5 petals)

Assemble

1.       Fold & score a piece of A5 white card in half.

2.       Cut a pattern background panel from the paper pad to fit the diamond frame using glue attach the frame to the background.

3.       Apply glue to the round tips of the stems & add prills set aside to dry.

4.       Attach the lacy border to the left side of the diamond frame.

5.       Cut a piece of pattern paper 2cm x 14½cm & attach to the left side along the straight edge of the lacy border.

6.       Attach some ribbon along the straight edge of the lacy border & the above strip, fold the ends of the ribbon around to the back of the background & attach the card front.

7.       Tie a piece of twine through the tag & attach to the card front.

8.       Shape the flower petals & stack together, add some prills to the centre.

9.       Attach the stems & leaves to the card front.

10.   Attach the floral circle with double sided tape & mount the sentiment shield with foam tape to the card front.

11.   Adhere the flower over the leaves.

12.   Attach some sticky pearls along the lacy border & ribbon edge above & below the flower.

13.   Tie a bow from the ribbon & attach under the flower to the bottom of the card.


Created By: Cheryl Peterie


Wednesday, 1 August 2018

Creative Team Wise Men Glitter Christmas Card

Creative Team Wise Men Glitter Christmas Card

by Cookie Aguilar


The combination of glitter card behind super shiny mirror board on Cookie's Card makes her card super sparkly. Perfect for Christmas and looks fantastic behind our Crafts 4U Merry Christmas Square Die. Simple to make, here is her list of supplies:


Supplies:

 
Crafts 4U Glitter Card (silver has been used here)
Mirror Board (Gold & Silver has been used here)
Assorted Patterned Papers


Saturday, 19 May 2018

Creative Team Spread Your Wings 'Z' Fold Card

Creative Team Spread Your Wings 'Z' Fold Card

By Creative Team member - Cheryl Peterie


Supplies:

Kaisercraft 12"x12" Paper Fairy Garden Collection - Fluttering
Kaisercraft 12"x12" Fairy Garden - Sticker Sheet
Kaisercraft Collectables Fairy Garden Pkt
1/4” White Satin Ribbon

Tools:

Basic tool kit (trimmer, scissors, , pencil, tweezers etc)
Glue, Washi Tape (for holding dies in place)
Die Cutting Machine.


Instructions:

 
Fold & score the A5- white card in half, in the portrait position fold the right side open edge back to the left side centre fold, score again to give a crisp fold.


Cut a strip of A5 - white card to 1" x 8¼" to make the band, fold in half and score, then turn over and fold in the half again in the opposite direction and score.


From the Kaisercraft Fairy Garden Collection - Fluttering, for the Card cut two panels 4.8cm x 14.2cm (one from each side of the paper) & one 10.2cm x 14.2cm panel, for the Band cut two 2.2cm x 5cm & one 2.2cm x 10.3cm.

 
 Die cut the following pieces  Crafts4U Die Flutterby & the smaller stems from the Crafts4U Die Lavender Stems  on a piece of the Crafts4U A5 Glitter White & the Crafts4U Die Leafy Branch from a left over piece of the green side of the Kaisercraft Fairy Garden Collection - Fluttering & cut in to four pieces.


Attach the panels to the card & band as shown in the picture, adhere the edge of the Flutterby die cut  to the left panel, from the Kaisercraft Fairy Garden - Sticker Sheet place the narrow pink border along the centre of the band creasing the folds as you go & trim off excess.

Turn the band over & place some double sided tape on either end approx. 5cm in length & attach 2cm up from the bottom of the card.


From the Collectables Fairy Garden Pkt attach the butterfly border strip to the front of the band, adhere the three Lavender Stems & Leafy Branch pieces to the front panel.

Adhere one large flower from the Little Birdie Renae Blush 27pk & two small flowers from the Little Birdie Renae Celeste 27pk to the left side of the card front over the band, place the "Spread Your Wings" sentiment from the Fairy Garden - Sticker Sheet to the right side panel & adhere the "Happy Birthday" banner from the Collectables Fairy Garden Pkt to the top edge of the band.
Fussy cut two butterflies from the leftover Fairy Garden Collection - Fluttering adhere the medium one to the card front & the small one to the sentiment panel.
Tie a small bow with the 1/4” White Satin Ribbon & adhere above the large flower.
 
 
Created by Cheryl Peterie for Catchy Crafts


Wednesday, 16 May 2018

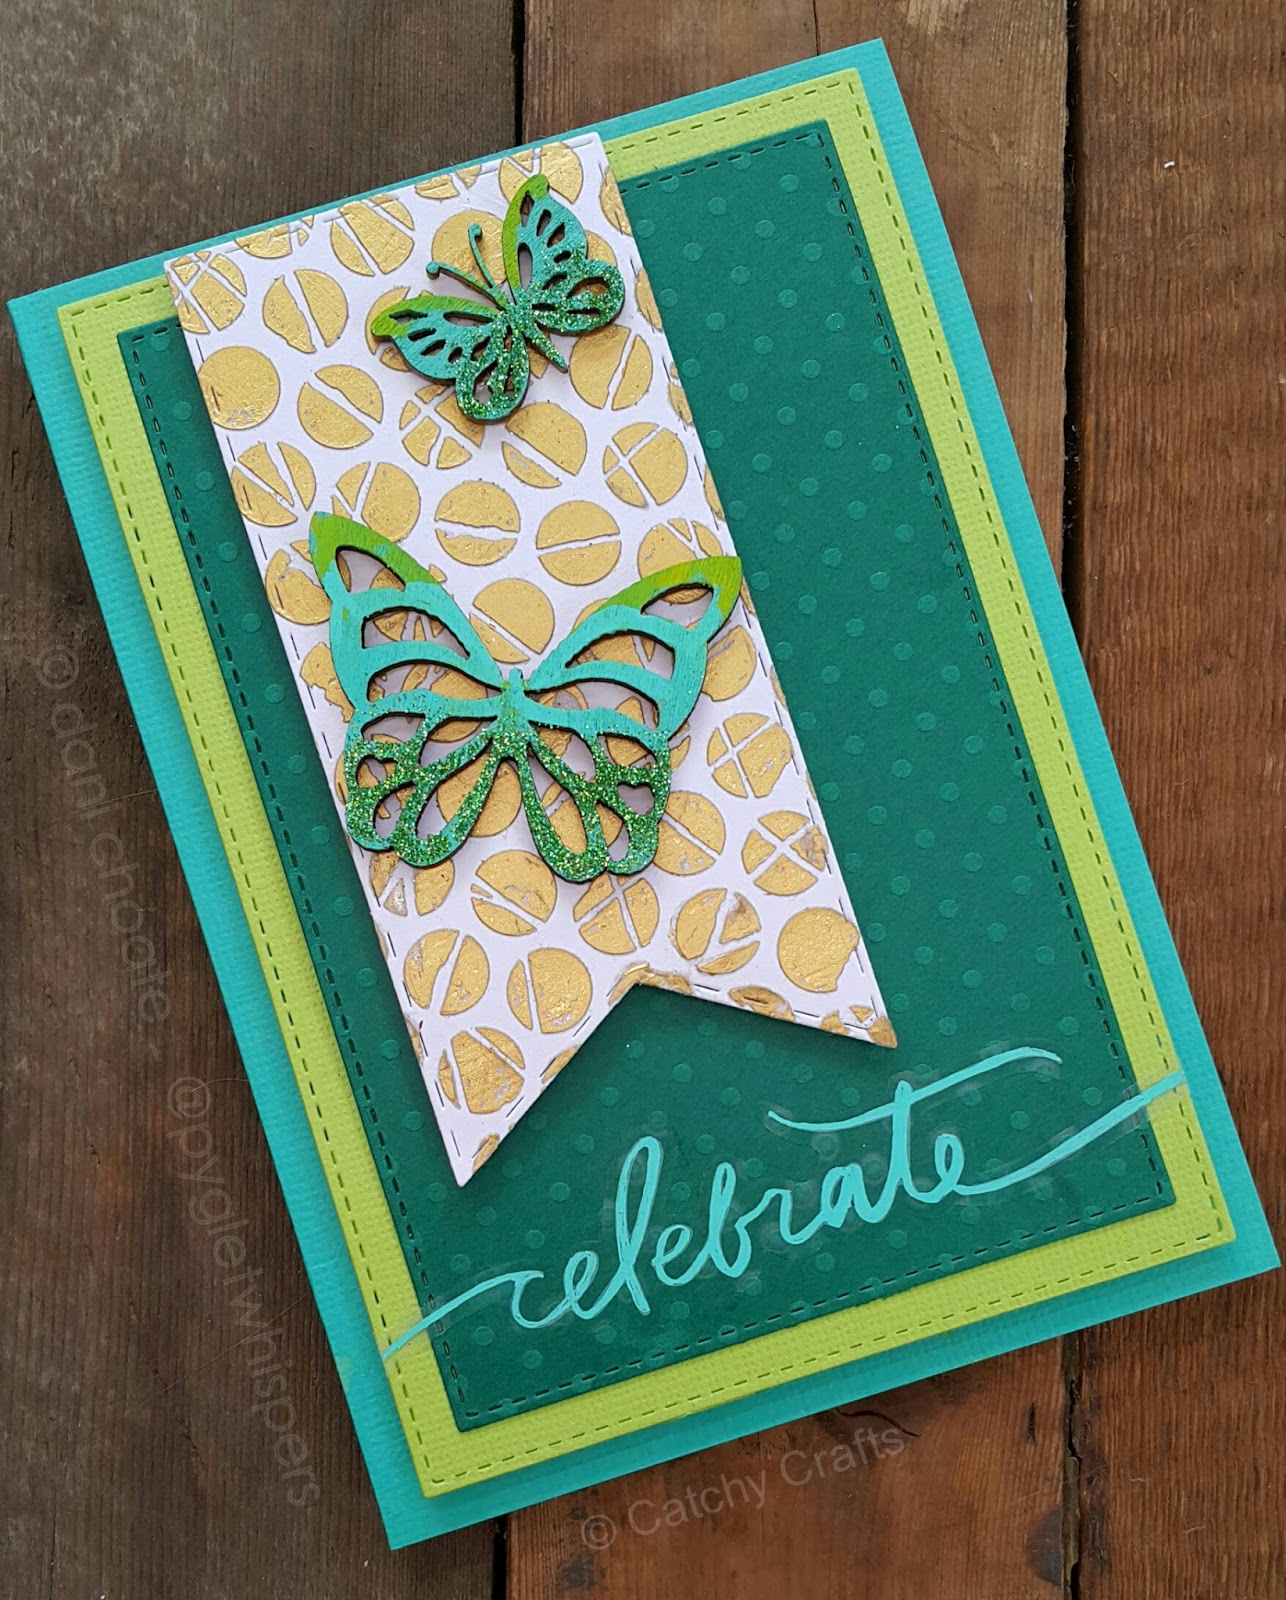
Creative Team Celebrate Butterfly Card

Creative Team Celebrate Butterfly Card

By Creative Team member - Dani Choate


Supplies:

Crafts 4U Stitched Rectangles Die - SDHX0048
Cadence Spots stencil - CADMU41 - (DARKROOM DOOR - small polka dots used)
Posca Pens -Aqua Green & Light Green
Create365 'celebrate' stickers
Kaisercraft Card Stock - Aqua green cardstock (card base) - Lime green cardstock - Deep Teal dot cardstock


Instructions:

Start by creating a C6 card out of Aqua cardstock
Die cut a Stitched rectangle in Lime green and another smaller sized stitched rectangle in deep teal
Mount these two rectangles with foam tape under the lime green and double sided tape under the deep teal.
Working on the white card stock, Use a stencil, a palette knife and the Cadence cream foil bond. Stencil the foil bond through the stencil cleanly and put aside until it has dried enough that the cream colour looks clear
Place the Heat Activated Foil onto the foil bond, once adequately dry. Once the gold has transferred you now have a patterned gold paper
Die cut the patterned gold card that you have made with the large stacked banner
Mount this banner shape with foam tape at the top right hand side of the card
 
Take the wooden butterfly embellishments. One large and one smaller. Colour with posca pens or acrylic paint. Aqua Green at the bottom and a small touch of light green at the top. Whilst still wet add Ultrafine green glitter to the bottom of the butterflies. The acrylic paint should adhere the glitter.
Attach both butterflies to the gold section of the card and also adhere the title to the bottom


Wednesday, 2 May 2018

Creative Team Butterfly Swirl Card

Creative Team Butterfly Swirl Card

By Creative Team Member - Linda Drynan


Linda has created this simple card featuring the Crafts 4 U Butterfly Swirl Die

Products Used:


Crafts 4 U Butterfly Swirl Die 10152
Crafts 4 U Fine Tip Glue Pen
Crafts 4 U Double Sided Tape
Crafts 4 U Smooth White A5 Card
Lawn Fawn Tiny Tag Saying Birthdays Stamp


Wednesday, 18 April 2018

Creative Team Love Card by Linda

Creative Team Love Cards

'Believe in Yourself' By Creative Team Member - Linda Drynan

Supplies:

Basic kit (tape, foam tape, scissors and trimmer)
Tim Holtz crinkle ribbon
Lawn Fawn “Believe in yourself” stamp set
2 tones of pink and some white glitter card stock
Water spritzer
White, light pink and darker pink, cardstock.


'You are my One & Only' By Creative Team Member Linda Drynan
 

Supplies:

2 x A5 white card
Glitter card stock in 3 shades of red
Light and dark pink, purple and black card stock
Typed words


Monday, 16 April 2018

Creative Team - With Love Card

Creative Team - With Love Card

By Creative Team Member - Helen Cooke


Supplies:

Die Cutting Machine

Instructions:

Take a piece of white card, and using the largest of the Decorative Rectangles, run it through your die cutting machine.   On another piece of white card of a similar size, emboss it using the Heart embossing folder.  Being careful to align the hearts, cut this to fit inside the Decorative Border, and adhere with double-sided tape.
Take another smaller piece of white card, and using both the third and smallest of the Decorative Rectangles, run them both through your die cutting machine.
Use the Die Brush & Foam Pad to push out any tiny pieces of card that may get caught in the borders.
On a scrap of white card, run the With Love die through your die cutting machine.
Adhere each layer with double-sided foam tape to add more depth and interest, and attach to the front of your card.


Wednesday, 11 April 2018

Creative Team - Honey Bee Card

Creative Team - Honey Bee Card

By Creative Team Member - Dani Choate


Supplies:

Crafts4U Stacked Hearts Die - 70031
Crafts4U Honeycomb Chickenwire die - 10191
Crafts4U Stitched Rectangle - 70002  - or - Simply Dies - StitchedRectangle Die - SDHX0048
Crafts4U Embossong folder - words - 30046
Orange lightweight card
Yellow lightweight card
White lightweight card
Crafts4U glitter card in champagne
Crafts4U Double sided tape
Crafts4U Double sided tape - aka 'toilet roll'
Crafts4U Foam tape
Crafts4U Paper Trimmer
Crafts4U Mini Scoring board
Tombow Mono liquid glue

Instructions:


Cut & fold the white lightweight card using your Crafts 4U paper cutter and scoring board.
This will be your 6" x 4" card base


Using the largest rectangular die, cut a rectangle of white card and emboss it using the Crafts 4U words embossing folder
Mount onto the card base using double sided tape
Using the largest outer die from the Stacked Hearts die set. Cut a solid white heart from white cardstock

By hand, carefully cut a slightly larger solid heart from orange cardstock

Mount the orange solid heart onto the embossed background using foam tape
Mount the white solid heart onto the orange heart using double sided tape


Using the 'toilet roll' double sided tape, tape the reverse side of another piece of white card
Cut this taped card using the Crafts 4U honeycomb die. Once cut, immediately cut again with the largest outer die from the stacked heart set aswell. This should leave you with a honeycomb heart that has peelable double sided tape on the reverse.

 
Peel off the tape and mount onto the white solid heart


Cut two more honeycomb dies. One from yellow card and one from orange card. We will be using the tiny hexagons from the die in a couple of steps


Now use the outer two dies from the stacked heart set and cut a heart 'ring' out of champagne glitter card. Do the exact same thing again... however, the second time use the 3rd & 4th largest outer hearts - this will give you a smaller heart 'ring'
Glue the two heart 'rings' to the white honeycomb heart upper layer but only at the dimple and the bottom point of the heart so that the curves of the hearts can be lifted up and stand above the white honeycomb layer


Now using the small hexagons... mount with tiny pieces of foam tape. Randomly place within the open hexagons on the white honeycomb layer
Fussy cut some bees from scrapbooking paper. I have used 'Harmonious Honeybee' paper from the Nature Sketchbook Collection by GRAPHIC 45. Attach as if flying on the heart 'rings'

Choose a sentiment and attach as a flag from the lower right of the heart cluster