Showing posts with label flower shaping. Show all posts

Monday, 17 September 2018

Creative Team Precious Petals

Creative Team Precious Petals

by Cheryl Peterie


Supplies:


Kaisercraft - Wondering Ivy 6½" Paper Pad
Kaisercraft Card Stock - Forest
Kaisercraft Cardstock - Navy
Navy Satin Ribbon
Sticky Pearl strip
Twine - Navy

Tools

Basic tool kit (Crafts4U trimmer, scissors, Crafts4U double sided Tape, Crafts4U Foam Tape, pencil, tweezers etc), Glue, Washi Tape (for holding dies in place), Die Cutting Machine, Flower Shaping Kit.


Instructions:

(NB; with nesting dies No.1 being the smallest)

Die-cut the following pieces


·         One diamond frame & the two stems together from a piece of A5 white card.

·         One lacy border from a piece of pattern paper.

·         One set of leaves from the forest cardstock (cut into three pieces).

·         One No.4 Tag from a piece of pattern paper.

·         flowers from navy cardstock (one No.2, one No.4 & two No.5 petals)

Assemble

1.       Fold & score a piece of A5 white card in half.

2.       Cut a pattern background panel from the paper pad to fit the diamond frame using glue attach the frame to the background.

3.       Apply glue to the round tips of the stems & add prills set aside to dry.

4.       Attach the lacy border to the left side of the diamond frame.

5.       Cut a piece of pattern paper 2cm x 14½cm & attach to the left side along the straight edge of the lacy border.

6.       Attach some ribbon along the straight edge of the lacy border & the above strip, fold the ends of the ribbon around to the back of the background & attach the card front.

7.       Tie a piece of twine through the tag & attach to the card front.

8.       Shape the flower petals & stack together, add some prills to the centre.

9.       Attach the stems & leaves to the card front.

10.   Attach the floral circle with double sided tape & mount the sentiment shield with foam tape to the card front.

11.   Adhere the flower over the leaves.

12.   Attach some sticky pearls along the lacy border & ribbon edge above & below the flower.

13.   Tie a bow from the ribbon & attach under the flower to the bottom of the card.


Created By: Cheryl Peterie


Wednesday, 5 September 2018

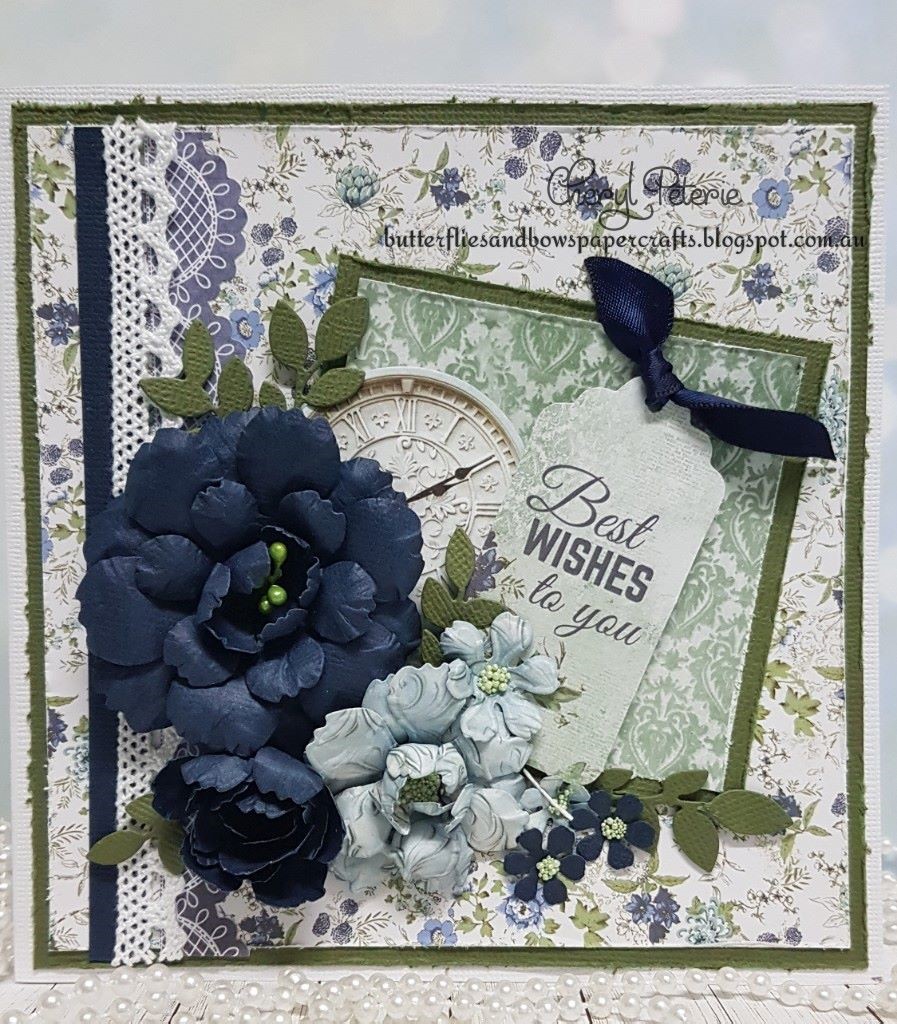
Creative Team Lacy Floral Blooms Card

Creative Team Lacy Floral Blooms Card

by Cheryl Peterie


Supplies:

Kaisercraft Paper Pad 6½"  - Wandering Ivy
Kaisercraft Collectables Pack - Wandering Ivy
Kaisercraft Sticker Sheet - Wondering Ivy
Kaisercraft Cardstock - Forest & Navy
Stamens - Green
Satin Ribbon - Navy
Lace - White
Basic tool kit (Crafts4U trimmer, scissors, Crafts4U double sided Tape, Crafts4U Foam Tape, pencil, tweezers etc), Glue, Washi Tape (for holding dies in place), Die Cutting Machine.


Instructions:

 
Cut the following pieces
White Cardstock (card base) - cut a 6" x 12" card base fold in half & score to form a 6" x 6" square.
Forest Cardstock (background mat) - cut a 5¾" x 5¾" & a 3¼" x 3¼" distress the edges of both mats.
Navy Cardstock - ½" x 5½" strip.
Lace - 5½"
Pattern Paper (background) - 5½" x 5½" & a 3" x 3" distress the edges of both backgrounds.
Attach the pattern pieces to the background mats leaving an even border, next attach the large background to the front of the card, then the small mat to the card front, add the navy strip, the scallop lace sticker (from sticker sheet) & the white lace to the left side of the card front.


To make the flowers

(NB; with nesting dies No.1 being the smallest) 

Die-cut the following pieces for all flowers (pattern & navy), individual pictures show what petals are needed for each flower.

Navy cardstock

·         Two - No.6 petals

·         Three - No.4 petals

·         Two - No.3 petals

·         Two - No.1 petals

Pattern Paper (not pictured with dies) lightly blend the entire petal with Distress Ink - Stormy Sky

·         Two - No.4 petals 

·         One - No.3 petal 

·         One - No.2 petal

·         One - No.1 petal

Forest Cardstock - one Leafy Branch & cut in to four pieces.

Shape all the petals using the Heartfelt Creations Deluxe Flower Shaping Kit 


Two No.4 & One No.3 Petals to make the medium navy flower


Large Navy Flower: Offset & adhere the two No.6, No.4 & No.3 petals together, pierce a hole through the centre & add the stamens, apply dries clear glue to both sides of the hole to secure the stamens when dry cut off the stems at the back of the flower.

Medium Navy Flower: Adhere the two No.4 & No.3 petals together & shape into a bud.

Medium Pattern Flower: Offset & adhere the two No.4 petals & the No.3 petal, adding prills to the centre

Single Flowers: Shape & add prills to the centres.

 
I have used the "Best Wishes" tag from the paper pad & the clock from the collectables pack, tie a piece of satin ribbon through the top of the tag using foam tape mount to the card front, next attach the clock then to finish adhere the leaves & flowers.
 
 
Created by Cheryl Peterie


Saturday, 17 March 2018

Creative Team - Shabby Chic Wedding Card & Box

Shabby Chic Wedding Card & Box

By Creative Team Member - Cheryl Peterie


Supplies:

12” x 12” Smooth White Cardstock (x3 sheets)
White Paper Flowers
Kaisercraft Decorative Dies & Stamps - Sage & Grace
Archival Ink - Olive & Rose Madder
Satin Ribbon
Sticky Pearls
Plastic Acetate 4½” x 5½” piece
Tools
Basic tool kit (trimmer, scissors, double sided Tape, pencil, tweezers etc)
Glue, Foam Tape
Craft Tray
Washi Tape (for holding dies in place)
A4 Die Cutting Machine
Crafters Companion The Ultimate Pro
 

Instructions:

(NB: Nesting dies No.1 being the smallest)
For the Card:
From one of the 12”x 12” sheets cut a 6” x 12” card base fold in half & score.
Roughly colour 28 small white paper flowers with Archival Ink - Rose Madder & a finger dauber, 18 flowers need to be coloured both sides.
To make the buds use the flower shaping kit to shape the flowers by rolling the ball stylus to the centre of the flower repeat with 18 of the double sided coloured flowers (two petals = one bud) apply glue to the centre tips of the petals & pinch to form a ball, add glue to the centre of the second petal as well as the centre tips place the 1st flower ball into the centre & again pinch into a ball repeat to make 9 buds.
To make the roses, place the single sided coloured flowers colour side down & press each petal turn over & press down in the centre of the flower & adhere a bud to the centre.


Trim the ”Miss Betty”  blue dots Paper  to 5¾” x 5¾” & attach to the front of the card base leaving an even border.
From the cream lacy paper nest the No.2 & No.3. Decorative Oval Dies & cut to make a frame, on the remaining paper stamp the Sage & Grace leaves with Archival Ink - Olive & colour with Distress Ink - Forest Moss & a finger dauber & cut out with the matching die.
From the white glossy doily paper cut the Bride & Groom image.
Use the following pieces from the paper pack.
 
 
Attach the two brackets to the top of the card one lower than the other.
Attach the scallop border to the bottom of the card front.
Attach the tag to the left side & adhere a sticky pearl to the top of the tag, next the circle “XO” under the bottom of the tag.
Adhere the N0.3 frame to the centre of the card front, mount the bride & groom with foam tape to the bottom of the oval frame, mount the “Congratulations” sentiment with foam tape over the tag.
Adhere three leaves, four roses & two buds around the oval frame.
Tie a bow from the satin ribbon & adhere to the left side of the frame under the roses.


For the Box:

From the other two sheets of 12” x 12” white cardstock cut two 7½” x 7½” squares.
Using the Crafters Companion Ultimate Pro place the base square along the top edge of the box base side & score on the 1st score line repeat on all sides of the box base (it’s a good idea to pencil mark base/lid & erase once assembled), then turn the Ultimate Pro around to the box lid side place the lid square along the top edge & score on the 1st score line repeat on all sides of the lid, make one cut from each corner to form the tabs.


Place (Do Not Stick) the other full square of the ”Miss Betty”  blue dots Paper  to the front of the box lid, hold in place with washi  tape line up the No. 3 & No. 4 Decorative Oval to cut the hole from the centre (blue frames not used).


Attach the plastic acetate with double sided tape to the front of the lid.

Turn the lid to the inside & adhere the tabs to form a box lid, the same can be done to the base
 
From the other piece of cream lacy paper nest the No.3 & No.4 Decorative Oval Dies & cut to make a frame, only using the outer frame adhere to the acetate inside the oval cut out.

Attach the blue dots Paper to the front of the lid lining up the frame cut out.
Using glue adhere two leaves to the top left corner with one rose & two buds, then gift wrap with extra satin ribbon.