Showing posts with label Crafts 4U. Show all posts

Wednesday, 16 January 2019

Creative Team - Boutique Elegance Card

Creative Team - Boutique Elegance Card

By Cheryl Peterie


Products Used

Kaisercraft Miss Betty Collection 12" x 12" Paper - Stitched
Kaisercraft Miss Betty Collection 12" x 12" Paper - Tapestry
AC Cardstock 12" x 12" - Rain (or pale Blue)
Sticky Pearl Strip 
1/4" Satin Ribbon - White
Sentiment Stamp of choice (pictured is Kaisercraft Happy Birthday)


Tools
Basic tool kit (Crafts4U trimmer, scissors, Crafts4U double sided Tape, Crafts4U Foam Tape, pencil, tweezers etc), Glue, Washi Tape (for holding dies in place), Die Cutting Machine.
Instructions
(NB; with nesting dies No.1 being the smallest)
Die-cut the following pieces
·         Rain Cardstock - Layered Frame & the No.4 Oval (emboss the oval with the Tiny Dots folder)
·         Pattern Paper - Tapestry - No.2 Mannequin (largest) I used the bottom left corner of the paper place a tiny strip of pearls around the neck.
 
 
Cut the base card from the 12" x 12" White cardstock measuring 15cm x 21cm fold in half & score, cut a pattern background panel to 10cm x 14.5cm & attach to the card front.
 
Using a fine tip glue adhere the frame die-cut to the pattern panel.


Trim the small rose stems & wrap one of the stems around to secure all three & adhere with glue to the card front, Attach the Mannequin to the embossed oval & mount using foam tape to the card front.


Using glue adhere the large flower over the stems of the small roses & a small bow in between.


Stamp a sentiment onto a piece of leftover cardstock, cut into a banner & blend the edge with Distress Ink - Spun Sugar, place a piece of foam tape to the middle of the banner & glue either end down slightly curling the right end up.

 
Created by: Cheryl Peterie


Monday, 24 September 2018

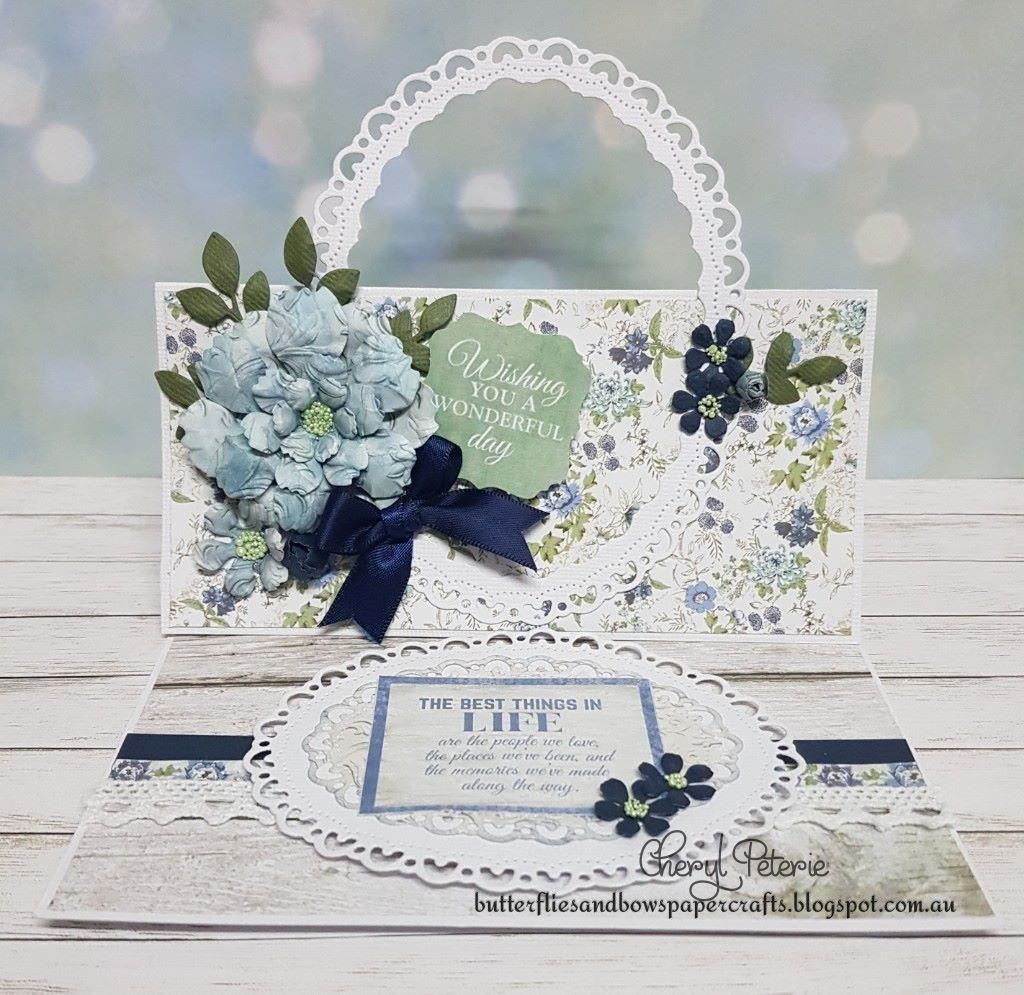
Creative Team Blue Post Easel Card

Creative Team Blue Posy Easel Card

by Cheryl Peterie


Supplies:

12" x 12" Smooth White Card stock
Kaisercraft Cardstock - Forest
Kaisercraft Cardstock - Navy
Kaisercraft - Wandering Ivy 12" Paper Pack
Kaisercraft -Wandering Ivy 6½" Paper Pad
Navy Satin Ribbon
White Lace
Flower Shaping Kit

Tools

Basic tool kit (Crafts4U trimmer, scissors, Crafts4U double sided Tape, Crafts4U Foam Tape, pencil, tweezers etc), Glue, Washi Tape (for holding dies in place), Die Cutting Machine.


Instructions

(NB; with nesting dies No.1 being the smallest)

Cut a white card base to 12" x 6" fold in half to a 6" x 6" square & score, open out flat then fold the left side to the centre fold line to create the easel fold.


 Die cut the following pieces
·         No.5 & No.4 Decorative Ovals to make a frame from white cardstock.
·         No.1 Decorative Oval from a piece of pattern paper blend the edge of this oval with Distress Ink-Stormy Sky.


To make the large flower die cut the following petals from the same paper as the No.1 oval & blend with Distress Ink - Stormy Sky, once cut & blended assemble & add prills to the centre

·         Two - No.5 petals

·         One - No.3 petal

·         One No.2 petal (cut an extra one for the single flower)

·         Two No.1 petals shape & form into a bud

Navy Cardstock - die cut two No.2 petals shape & form into a bud, die cut four No.1 petals shape leave single & add prills to the centres. (Best Wishes sentiment pictured instead of Wishing You)


Cut the following pieces

1.       Background panel to fit the inside base of the card leaving an even border.

2.       Cut from the same paper as above a 7.3cm x 15cm & attach to the top panel of the card front.

3.       Cut from the floral paper 7.3cm x 15cm & attach to the bottom panel on the card front

4.       Cut a 1cm x 15cm strip of navy cardstock.

5.       Cut a 1cm x 15cm floral strip.

6.       Cut a 15cm piece of lace & attach pieces 4, 5 & 6 to the bottom of the inside base panel.
 
 
Attach the pattern decorative oval to the white decorative oval, next attach the "Best things in Life" sentiment to the centre of the ovals & adhere two small navy flowers to the bottom corner of the sentiment, then using foam tape mount to the inside background panel to make the base stopper.


Attach the bottom half of the decorative oval frame to the bottom panel of the card front, add the leaves, flowers, buds, sentiment & to finish tie a bow from the satin ribbon dove tail the ends & adhere to the bottom of the flowers.


Monday, 17 September 2018

Creative Team Precious Petals

Creative Team Precious Petals

by Cheryl Peterie


Supplies:


Kaisercraft - Wondering Ivy 6½" Paper Pad
Kaisercraft Card Stock - Forest
Kaisercraft Cardstock - Navy
Navy Satin Ribbon
Sticky Pearl strip
Twine - Navy

Tools

Basic tool kit (Crafts4U trimmer, scissors, Crafts4U double sided Tape, Crafts4U Foam Tape, pencil, tweezers etc), Glue, Washi Tape (for holding dies in place), Die Cutting Machine, Flower Shaping Kit.


Instructions:

(NB; with nesting dies No.1 being the smallest)

Die-cut the following pieces


·         One diamond frame & the two stems together from a piece of A5 white card.

·         One lacy border from a piece of pattern paper.

·         One set of leaves from the forest cardstock (cut into three pieces).

·         One No.4 Tag from a piece of pattern paper.

·         flowers from navy cardstock (one No.2, one No.4 & two No.5 petals)

Assemble

1.       Fold & score a piece of A5 white card in half.

2.       Cut a pattern background panel from the paper pad to fit the diamond frame using glue attach the frame to the background.

3.       Apply glue to the round tips of the stems & add prills set aside to dry.

4.       Attach the lacy border to the left side of the diamond frame.

5.       Cut a piece of pattern paper 2cm x 14½cm & attach to the left side along the straight edge of the lacy border.

6.       Attach some ribbon along the straight edge of the lacy border & the above strip, fold the ends of the ribbon around to the back of the background & attach the card front.

7.       Tie a piece of twine through the tag & attach to the card front.

8.       Shape the flower petals & stack together, add some prills to the centre.

9.       Attach the stems & leaves to the card front.

10.   Attach the floral circle with double sided tape & mount the sentiment shield with foam tape to the card front.

11.   Adhere the flower over the leaves.

12.   Attach some sticky pearls along the lacy border & ribbon edge above & below the flower.

13.   Tie a bow from the ribbon & attach under the flower to the bottom of the card.


Created By: Cheryl Peterie


Monday, 27 August 2018

Creative Team Framed Memories Card

Creative Team Framed Memories Card

By Cheryl Peterie


Supplies:


Kaisercraft 12x12 Paper - Chartreuse
Kaisercraft Collectables Pack - Heirloom
Satin Ribbon 1/4"
 

Tools:

Basic tool kit (Crafts4U trimmer, scissors, Crafts4U double sided Tape, pencil, tweezers etc),Die Cutting/Embossing Machine, Washi Tape (for holding dies in place), Paper Distresser.


Instructions:

 
Fold & score a piece of A5 White card in half, Die cut the  Crafts4U Die Lacey Border 3 10161 along the right side of the card


Cut a background panel from the pattern paper(yellow side) to measure 8cm x 14.5cm, distress the edges, attach a piece of satin ribbon to the right side & attach to the card front.


(NB; with nesting dies No.1 being the smallest)

·         Nest & die cut the No.2 & No. 3 labels from the Layered Frame set (floral side of the above pattern paper)

·         Die cut the No.1 label (yellow side of pattern paper) Stamp your desired sentiment.

 
Mount the frame using Crafts4U 3mm x 4m Foam Tape 2mm Thick 30013 & attach to the card front.


From the Heirloom Collectables pack attach the stop watch inside the bottom left corner of the frame, the "Our Memories Will Last Forever" sentiment to the right side of the frame & the Remember banner to the top left corner of the card.

 
Attach the No.1 yellow label to the No.2 floral label & attach to the inside centre of the card.


Adhere a mix of small flowers & two leaves from the Little Birdie Curly Rose Yellow 12pk CR62800Little Birdie Renae Blush 27pk CR63041Little Birdie Renae Celeste 27pk CR63038 flower packs to the card front, then tie a small bow from the satin ribbon & adhere under the flowers to the bottom of the frame.


Monday, 20 August 2018

Creative Team Precious Petal Cards

Creative Team Precious Petal Cards

by Peta Burrows

Peta created this beautiful card earlier in the year for a class that was taught in store. She uses the Crafts 4U Precious Petals Die Set to create a simple layered flower that she has coloured with Distress inks. She has added some stamens to the centre and a few drops of transparent Jewel drops on the petals that make it look like there is dew drops on the petals.


Supplies:

Distress Inks in - Worn Lipstick & Tattered Rose
Assorted wood or light patterned papers