Wednesday 30 May 2018

Creative Team Love You Mama Butterfly Card

Creative Team Love You Mama Butterfly Card

By Creative Team Member Yoonsun Hur


Supplies:


Instructions:
 
So today I have a beautiful Butterfly card with the IO Butterflies stamp set and the C4U Claudie Butterfly die. I started by heat embossing butterflies onto watercolour paper using VersaMark embossing ink. I then watercoloured the stamped panel with Ken Oliver Crafts Color Burst Alizarin Crimson, Yellow Ochre.
 
 
Once the watercoloured panel was completely dry, I mounted it on top-folded white card base using C4U double sided tape first, and then added the sentiment & Claudie Butterfly die cut using C4U foam tape.
 

Thank you so much for stopping by. Happy crafting!!

Hugs,
Yoonsun


Monday 28 May 2018

Creative Team - Magic Memories

Creative Team - Magic Memories

By Creative Team Member - Cheryl Peterie


Supplies:


Kaisercraft Fairy Garden - Sticker Sheet

Kaisercraft Fairy Garden 12x12 Paper - Flutterby

Kaisercraft Fairy Garden 12x12 Paper - Mystify

Cadence Dora 3D Paint 5176 Candy Floss

12"x12" Pale Blue Cardstock

1/2" Cream Satin Ribbon
 

Tools:

Basic tool kit (trimmer, scissors, double sided Tape, Foam Tape, pencil, tweezers etc),
Glue
Paper Distresser
Zutter Bow-it-All V-3
paint brush.


Instructions:

 
First choose three flowers from the wooden embellishment pack, paint with the Cadence 3D Candy Floss paint & add a dot to the centre of the flower.


Trim the Fairy Garden-Mystify paper (striped side up) to 11.5" x 11.5" distress the edges & attach to the pale blue cardstock leaving an even border.


Trim the Fairy Garden Flutterby paper to 8" x 12" (green side up) distress the edges & attach to the page, from the left over butterfly side of the same paper cut a 4" x 6.5" panel distress the edges & attach to the page, from the Fairy Garden Sticker Sheet attach the black border to the left side of the green panel, attach the narrow blue border to the right side of the striped background, attach the large sentiment border to the bottom of the page last add the photo over the butterfly paper.


Locate the following pieces from the Fairy Garden Collectables pack, mount the large sentiment with foam tape to the top left corner of the photo & adhere the others with glue.


Adhere a mix of flowers & leaves from the Little Birdie Renae Blush & Renae Celeste flower packs in clusters around the page, next adhere the three painted wooden flowers to the three floral clusters.

Cut two pieces off the crystal clear bling flourish & place to the left & bottom of the photo.

Tie a triple bow (I have used the Zutter Bow-it-All V-3) & adhere to the left side of the photo.
Fussy cut five butterflies from the leftover paper & adhere around the page leaving the wings free
 
Created By: Cheryl Peterie


Saturday 26 May 2018

Creative Team - Sending My Prayers

Creative Team - Sending My Prayers

By Creative Team Member Yoonsun Hur


Supplies:


Today I have a watercoloured CAS card with Ken Oliver Crafts Color Burst: Alizarin Crimson and Yellow Ochre.
 

Before applying Color burst, I brushed on watercolour paper with clean water. I then applied Color burst powder on a wet watercoloured surface. I spritzed Alizarin Crimson (red, left) first, lightly brushed red colour and then added Yellow Ochre (right).


It’s my first time to use Color Burst. The colours are so vibrant and beautiful!!

 
I die cut butterflies from white card stock using the C4U Mable Butterfly & Claudie Butterfly die cuts. They are so pretty!!


Wednesday 23 May 2018

Creative Team Where the Wind Takes You

Creative Team Where the Wind Takes You

By Creative Team member - Helen Cooke


Supplies:


Cardstock white, mustard
 
Inkssentials – Foil Tape Sheets
 
Adirondack Alcohol Inks – Butterscotch; Lettuce; Cranberry; Eggplant


Carpe Diem word label stickers – Posh


Instructions:

I started by cutting white card 14.5cm x 8cm.  I next cut a piece of the foil tape sheet just a little bigger and adhered it to the white card.  Foil tape is quite sticky however, if it isn’t straight, it is possible to gently peel it back and reposition it.  Trim any overhanging excess.
Next, put it in the Butterfly and Vine embossing folder and run it through your  Cuttlebug (or equivalent).
Add drops of Butterscotch and Lettuce alcohol ink to the applicator and pounce over the foil.  As it dries quite quickly, you can continue doing this until happy with how it looks.  I then dripped a tiny amount of the blending solution onto the swirls which allowed the original colour of the foil to show through.
 
 
On a piece of leftover foil (attached to white card) I repeated the process, this time using Cranberry and Eggplant alcohol ink.  I then cut three Claudie butterflies, folded up their wings and adhered just their bodies to the butterflies on the embossed card.
 
 
I found a sentiment that was appropriate for the butterflies and stuck them on the right hand side of the tag.
I finished off by adhering the tag to a piece of textured mustard card which is just a couple of millimetres bigger than the original tag. I punched a hole in the top and added some ribbon which co-ordinated with the butterflies.


Monday 21 May 2018

Creative Team Hello Beautiful Card

Creative Team Hello Beautiful Card

By Creative Team member - Dani Choate


Supplies:

Pink Paislee patterned paper 10 - use squares of pink, aqua & yellow tones to cut butterflies out
Pinkfresh Be You 'Sincere' paper - green with dot
Kaisercraft Cardstock in Aqua - Pink
Smooth White White cardstock
Helmar 450 glue


Saturday 19 May 2018

Creative Team Spread Your Wings 'Z' Fold Card

Creative Team Spread Your Wings 'Z' Fold Card

By Creative Team member - Cheryl Peterie


Supplies:

Kaisercraft 12"x12" Paper Fairy Garden Collection - Fluttering
Kaisercraft 12"x12" Fairy Garden - Sticker Sheet
Kaisercraft Collectables Fairy Garden Pkt
1/4” White Satin Ribbon

Tools:

Basic tool kit (trimmer, scissors, , pencil, tweezers etc)
Glue, Washi Tape (for holding dies in place)
Die Cutting Machine.


Instructions:

 
Fold & score the A5- white card in half, in the portrait position fold the right side open edge back to the left side centre fold, score again to give a crisp fold.


Cut a strip of A5 - white card to 1" x 8¼" to make the band, fold in half and score, then turn over and fold in the half again in the opposite direction and score.


From the Kaisercraft Fairy Garden Collection - Fluttering, for the Card cut two panels 4.8cm x 14.2cm (one from each side of the paper) & one 10.2cm x 14.2cm panel, for the Band cut two 2.2cm x 5cm & one 2.2cm x 10.3cm.

 
 Die cut the following pieces  Crafts4U Die Flutterby & the smaller stems from the Crafts4U Die Lavender Stems  on a piece of the Crafts4U A5 Glitter White & the Crafts4U Die Leafy Branch from a left over piece of the green side of the Kaisercraft Fairy Garden Collection - Fluttering & cut in to four pieces.


Attach the panels to the card & band as shown in the picture, adhere the edge of the Flutterby die cut  to the left panel, from the Kaisercraft Fairy Garden - Sticker Sheet place the narrow pink border along the centre of the band creasing the folds as you go & trim off excess.

Turn the band over & place some double sided tape on either end approx. 5cm in length & attach 2cm up from the bottom of the card.


From the Collectables Fairy Garden Pkt attach the butterfly border strip to the front of the band, adhere the three Lavender Stems & Leafy Branch pieces to the front panel.

Adhere one large flower from the Little Birdie Renae Blush 27pk & two small flowers from the Little Birdie Renae Celeste 27pk to the left side of the card front over the band, place the "Spread Your Wings" sentiment from the Fairy Garden - Sticker Sheet to the right side panel & adhere the "Happy Birthday" banner from the Collectables Fairy Garden Pkt to the top edge of the band.
Fussy cut two butterflies from the leftover Fairy Garden Collection - Fluttering adhere the medium one to the card front & the small one to the sentiment panel.
Tie a small bow with the 1/4” White Satin Ribbon & adhere above the large flower.
 
 
Created by Cheryl Peterie for Catchy Crafts


Wednesday 16 May 2018

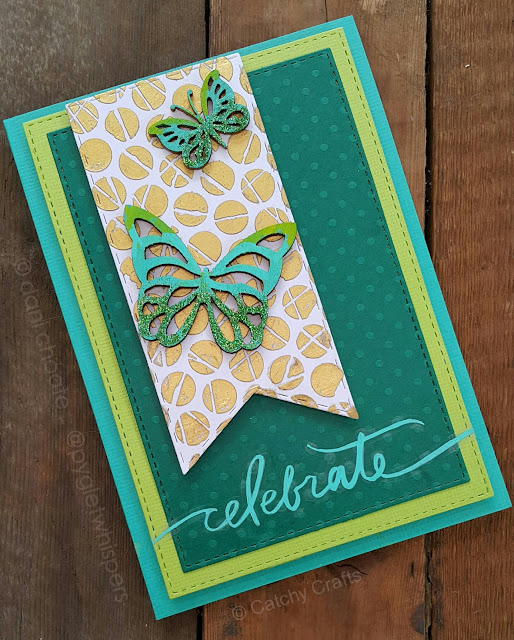
Creative Team Celebrate Butterfly Card

Creative Team Celebrate Butterfly Card

By Creative Team member - Dani Choate


Supplies:

Crafts 4U Stitched Rectangles Die - SDHX0048
Cadence Spots stencil - CADMU41 - (DARKROOM DOOR - small polka dots used)
Posca Pens -Aqua Green & Light Green
Create365 'celebrate' stickers
Kaisercraft Card Stock - Aqua green cardstock (card base) - Lime green cardstock - Deep Teal dot cardstock


Instructions:

Start by creating a C6 card out of Aqua cardstock
Die cut a Stitched rectangle in Lime green and another smaller sized stitched rectangle in deep teal
Mount these two rectangles with foam tape under the lime green and double sided tape under the deep teal.
Working on the white card stock, Use a stencil, a palette knife and the Cadence cream foil bond. Stencil the foil bond through the stencil cleanly and put aside until it has dried enough that the cream colour looks clear
Place the Heat Activated Foil onto the foil bond, once adequately dry. Once the gold has transferred you now have a patterned gold paper
Die cut the patterned gold card that you have made with the large stacked banner
Mount this banner shape with foam tape at the top right hand side of the card
 
Take the wooden butterfly embellishments. One large and one smaller. Colour with posca pens or acrylic paint. Aqua Green at the bottom and a small touch of light green at the top. Whilst still wet add Ultrafine green glitter to the bottom of the butterflies. The acrylic paint should adhere the glitter.
Attach both butterflies to the gold section of the card and also adhere the title to the bottom